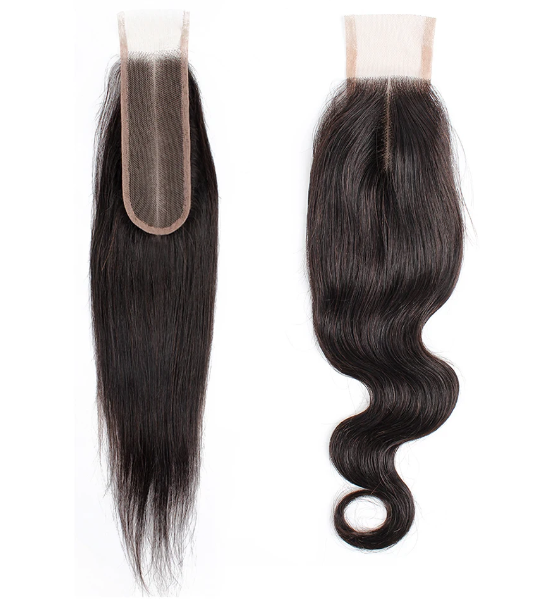
What Is a 2x6 (Kim K) Closure & Quick Weave Tutorial | 2x6 vs 4x4 Closure
Closure wigs use real human hair and can give you a most convincing and realistic look, and also allow higher styling flexibility than a standard full lace wig. Choosing between different lace closures may be challenging. Today we are going to introduce the 2x6 closure or Kim K closure, covering its pros, cons, uses, types, installation (quick weave) tutorial, and comparison with the 4x4 closure.

What Is a 2x6 Closure?
A 2x6 closure, which is also known as a Kim K (Kadarshian) closure or two-by-six closure, is a type of hair closure that is 2 inches wide and 6 inches long. It is the smallest type of closure with a very long pattern. The price of a Kim K closure is generally cheaper than larger human hair closures, even though some of them can be expensive. Kim Kadarshian Closure can be made from different types of human hair, such as Brazilian hair or Peruvian hair bundles.
Pros:
- Natural-looking hairline
- Creates a classy look when worn with long hair
- Cost-effective option compared to larger closures
Cons:
- Limited styling options due to the single-line style
- It may not be suitable for those looking for a more versatile closure
What is a 2x6 closure used for? The 2 by 6 closure is ideal for long straight hair or body wave textures and is best suited for people who want a simple and easy-to-wear hair closure and are not concerned with creating multiple hairstyles.
Types of 2x6 Closures
- 2x6 Lace closure: The standard 2x6 closure is made of a thin lace material with hair strands sewn into it.
- 2x6 HD (high-density) closure: 2x6 HD closures use a finer, more transparent lace that blends even more seamlessly into the scalp.
- 2x6 613 closure: a hair closure that is 2 inches wide and 6 inches long, with a blonde color (613) and a golden tone.
2x6 Closure Quick Weave Tutorial - How to Install a 2X6 Kim K Closure?
Here is an introduction to a step-by-step installation of the 2x6 closure quick weave.
Step 1: Prep the Closure
- Use a bleaching powder to lighten the knots on the closure (use a 1:1 ratio of powder to 40 volume developer).
- Apply the bleach mixture to the knots with a tool.
- Add foil and wrap the hair and closure to help produce heat and process the bleach faster.
- Let it sit for 25-30 minutes.
Step 2: Prep the Bundles
- Wash the bundles with a moisturizing shampoo and conditioner.
- Let them air dry completely.
Step 3: Prep the Hairline
- Use edge control to slick back the hairline.
- Apply a bald cap or wig cap to protect the hair and provide a surface to sew the closure onto (optional).
- If not using a bald cap, use a liquid adhesive to attach the closure to the hairline.
Step 4: Tint the Lace
- Use foundation to tint the lace of the closure to match the skin tone.
Step 5: Cut the Excess Lace
- Cut off the excess side tabs on the closure to make it more fragile.
Step 6: Attach the Closure
- Use a liquid adhesive to attach the closure to the hairline.
- Use an elastic band to hold the closure in place while sewing.
Step 7: Sew the Closure
- Use a needle and thread to sew the closure down around the hairline.
Step 8: Add a Protective Shield
- Apply a protective barrier to the hairline to prevent itchiness and hair loss.
- Use a clear liquid adhesive to attach the barrier to the hairline.
Step 9: Add the Tracks
- Use a liquid adhesive to attach the tracks to the hairline.
- Start by placing two tracks on top of each other, going from one end of the closure to the other.
- Place tracks from ear to ear to fill in the circle.
- Use a dryer to set the adhesive.
Step 10: Style the Hair
- Use a hot comb to flatten the hair over the tracks.
- Part the hair in the middle and use a hot comb to press and flatten the hair.
- Trim the excess lace and use concealer to address any over-bleached knots.
Step 11: Finish the Look
- Style the hair as desired.
- Use mascara to fill in any over-bleached knots.
- Use concealer to highlight the part and make it pop.
2x6 vs 4x4 Closure, What Are the Differences and Which Is Better?
4x4 is a more popular closure size for wigs. What are the differences between 4x4 and 2x6 closures?
1. Size. 2x6 Kim K closure is 2 inches wide by 6 inches long, and 4x4 closure is 4 inches wide by 4 inches long
2. Parting versatility. 2x6 is best suited for the deep middle part, while 4x4 allows for middle, side, or free parting.
3. Cost. 2x6 is typically more affordable due to the smaller size, and 4x4 is slightly more expensive.
4. Ease of installation. 2x6 is very easy to install, even for DIY, and 4x4 is still relatively easy but a larger size.
5. Maintenance. 2x6 is simpler to care for and maintain due to its smaller size, and 4x4 requires more effort.
6. Coverage. 2x6 provides coverage for the defined middle part, and 4x4 allows for more natural coverage and parting options.
7. Appearance. 2x6 gives the sleek middle part look, and 4x4 enables versatile styles and a more natural appearance.
If you want a more concealed hairline or frontal area and don't need extreme parting versatility, a 2x6 closure is probably the better option. However, if you want a very natural, convincing hairline and maximum parting flexibility and are also willing to invest more for a closure that looks done, the 4x4 closure is more ideal.

