What Is Balayage - How To Balayage Easily For Beginners
What is Balayage? Bayalage is actually a French word that translates to sweeping motion. While this is a technique it's actually become one of the top requested hairstyles in the salon. Being an artform balayage gives us as colorist the opportunity to create beautifully blended and results but in a really creative application. Today, we are going to show you all the basics of creating the perfect balayage, if you've ever struggled with the application balayage.
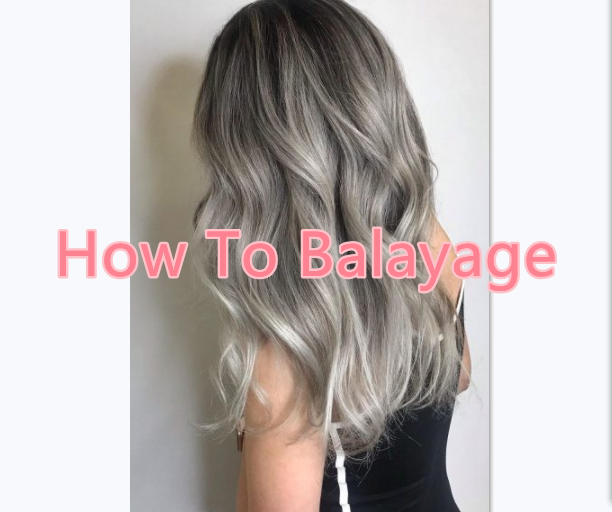
Things You Should Know Before Balayage
First, determine your natural level texture and density. Make sure to wear your hair and the way they typically part it. Before you start, you should show an inspiration picture to your hairstylist, show her what you looking for. Secondly, you can have that conversation about how many blondes do you want on the ends. If there's any dimension or depth throughout the ends, do more of a combination of surface and full saturation throughout the ends. Thirdly, you can talk about what type of maintenance you are looking for. Since balayage is a perfect application for a low maintenance grow-out, you should assess how far up or how far down want the application to be, which helps the hairstylist determine what application and what balayage will look like throughout each subsection of the hair. Fourth, find out what tonality you are looking for. If you prefer high contrast and result balayage might not be the best application for you. However, if the end results in tonality are more natural beigy and complement their natural skin tone and eye color, then balayage is going to be a great service for you.
Lightening Product For Balayage
The best product for lightening is Kenra Color - Simply Blonde Clay Lightner. This product has all the characteristics needed to create a perfect blend and a clean application. Also, you can bleach your virgin hair wigs on your own by using this product. The clay Lightner maintains moisture on the inside while creating an outer shell outside making it great for open-air processing. You can mix the clay Lightner 1 to 2 or 1 to 3 based on the viscosity you prefer and it processes for 45 minutes. Be sure to use simply blonds developers either 20 or 30 volume.
How To Section For Balayage
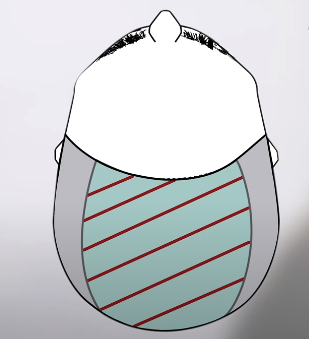
Universal sectioning is the best balayage application, it's clean super easy to work through. The first section is a top horseshoe section, definitely going to shift this to your part and how your hair naturally falls. This is also rounded to complement the natural shape of the head making sure that the end result is really seamless. In this section, we're going to work in diagonal subsections.
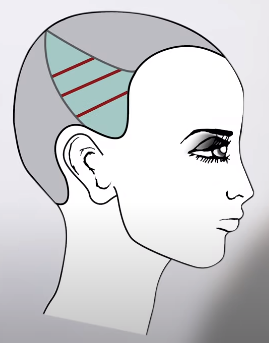
The second sections are the sides, we're again going to use curved lines going from the back center of the top horseshoe down to about the top center of the ear. Within these sections will be working in diagonal subsections as well.
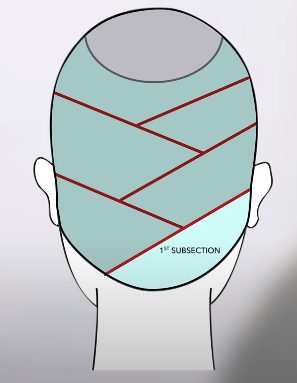
The third section is the rest of the hair which all falls in the back, here we'll be taking diagonal brick laid subsections making sure we're maintaining a clean and efficient application. The first diagonal subsection goes from the right side down to the opposite side of the nape, you'll see in the first subsection a good average size to utilize for balayage applications. This is going to create dimension and allow for mostly surface saturation.
How To Applicate Balayage
The size of your subsection will directly relate to how much saturation the ends need. If you need more saturation on the ends or if there are more solid end results on the smaller subsections, but if you want to achieve more dimension, the subsections can be larger. Then determine the mixing ratio by how much saturation you need, if you need to do more full saturation, mix it one two three, four with ease of product movement. If I want to do more surface saturation, mix it more one two two will continue alternating with these diagonals all throughout the back creating a beautiful brick lay process. The best advice is less product less pressure and adds more. As you go one of the ways to ensure your blend is nice and seamless is to brush in the opposite direction of your subsection. To create a beautifully dimensional end result, you can do a combination of full and surface saturation throughout the ends, to make sure that my subsection is only surface saturation, a great tip is to lift it up, to ensure that there's no product underneath.
Once completed the entire back subsection of your hair, move on to the sides. Starting on this side, take a diagonal subsection and paint the hair away from the face, hold your subsection and using pretty high tension, make sure use less product less pressure to apply in the front. Focus on the pattern of which you are painting to create some variation. As work to the front, you will do the opposite to create some definition, it's good to do more definitive lines in your painting and bring them a little higher up. To really create a blend, you can do a combination of upward brushing and downward brushing, because a nice combination of the two really helps to move the product and keep your lines seamless. again I'm going to leave
Move to the top of the hair, where you are going to take diagonal subsections. If you part the hair on the side, you'll want the diagonals to go toward the heavier side. A great tip to adjust for timing as we move towards the top of the hair is to mix up a fresh batch of clay Lightner and adjust your developer, so to make this top subsection process in a quick fashion to catch up to the back, you can use 30 volume instead of 20. As you move more towards the center of this top subsection, you'll notice everything starts to get a little bit wider. For control, you can always break these in half, to ensure the maintaining as much tension and as much surface coverage as possible. this is a great
Once you completed the top, ready to finish the application with hairline detail. Make sure to do that at the very end, so that it doesn't process as long, because this is a little bit more fragile. Using a totally clean brush and loading a bit of product onto it. Balayage is meant to look natural, you don't always have to tone, if you need to use a toner, rapid toner series is the best choice. Because rapid toner process in five minutes and less. For toning service especially after a full head balayage, this is one of the best products to use to make toning quick and easy.
